Email Creation Utility for Creating/Editing eBlast Marketing Campaign
The following section provides procedures to create Text or HTML documents with information and pre-defined Sales Simplicity merge fields.
These documents types are for creating:
o Customer Marketing eMails (Mass Marketing)
o Realtor Marketing eMails (Mass Marketing)
o Workflow eMail Notifications
· Customer eMails |
– used to send Mass Marketing Campaign related to Customers |
· Realtor eMails |
– used to send Mass Marketing Campaign related to Realtors |
· Workflow eMail Notifications |
– used to send an automated email notification when a process or action is triggered from within Sales Simplicity |
How to Prepare and Create Graphics
Prepare all graphic image(s) to be used in the Marketing Campaigns. When complete, these graphic image files MUST reside in your web server. During the creation of the eMail Blast Marketing Campaign HTML file, the graphic image are then linked to reference from within the HTML code, otherwise the graphic image(s) will NOT display when the Marketing Campaigns are sent out via email to the customers.
Step 1 – Create / Prepare the Graphic image(s)
There are two processes in creating/preparing a Marketing Campaign:
¡ Use the ECU to create the HTML file and insert the pre-prepared graphics images
¡ Use the ECU to download the pre-prepared HTML file with graphics images already inserted
Preparation of the graphic image must be done outside of Sales Simplicity as the ECU lacks the graphic image editing tool.
¡ Prepare the HTML file
-or-
¡ Prepare the graphic image(s)
¡ Place the graphic image(s) to your local web server folder location
¡ Test to make sure the graphic image displays properly on a web browser
How to use the ECU for Creating eMail Blast Marketing Campaign
The following steps provide procedures to create the HTML file, which can include graphic image(s) and merge-able data from Sales Simplicity
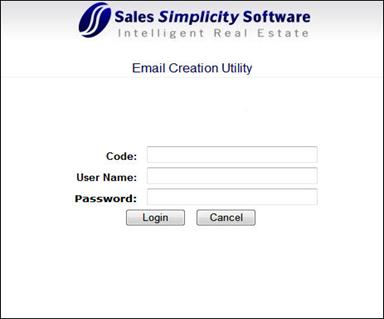
Step 1 – Log-in to the ECU website
1. From within Sales Simplicity - log-in to Sales Simplicity and go to the location from which the eBlast Creation Utility tab is created
o Auto-login can be setup, where Sales Simplicity will automatically type-in the Code, User Name, and Password
2. From outside of Sales Simplicity - Find the link to log-in to Sales Simplicity and at the end of the Sales Simplicity URL web address field, type “ECU” and press the “Enter” key on the keyboard (see example below)
![]()
For example: www.salessimplicity.net/ssnet/ECU (for Server #1)
www.salessimplicity.net/ssnet2/ECU (for Server #2)
www.Self-HostingServerName/ECU (for Self-Hosting)
o Enter the Code, User Name, and Password, then click the Login button or press the “Enter” key on the keyboard (same log-in id as in Sales Simplicity)
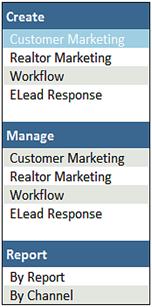
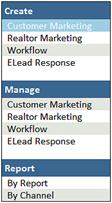
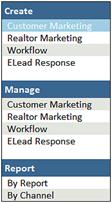
Once logged-in to the ECU, there are three (3) basic items that can be performed:
|
- Create a New Marketing Campaign for: ¡ Customer
Marketing ¡ Realtor
Marketing ¡ Workflow (internal workflow notifications) ¡ eLead Response (eLead Auto Response)
- Manage (Edit) an Existing Marketing Campaign for: ¡ Customer Marketing (e xisting campaigns) ¡ Realtor Marketing (existing campaigns) ¡ Workflow (existing workflows) ¡ eLead Response (eLead Auto Response)
- Reports Preview of eBlasted Marketing Campaign: ¡ By Reports ¡ By Channel |
Step 2 – Create a New Marketing Campaign or Template
|
- To Create a New Marketing Campaign in: ¡ Customer Marketing (marketing related toward Customer) ¡ Realtor Marketing (marketing related toward Realtor) ¡ Workflow (internal workflow notification) ¡ eLead Response (eLead Auto Response)
|
1. If a graphic image is needed to accompany the marketing campaign, then that image MUST be created first. Preparation of the graphic image must be done outside of Sales Simplicity as the ECU lacks the graphic editing tool.
¡ Prepare the graphic image(s)
¡ Place the graphic image to your web server folder location
¡ Test to make sure the graphic image displays properly on a web browser
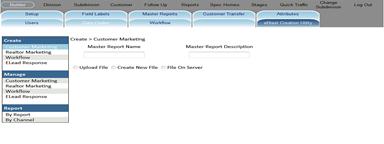
2. In the Create category tab, select Customer Marketing or Realtor Marketing
Type of Marketing |
Description |
Customer Marketing |
The completed marketing campaign will be targeted for Customer and executed in the “Follow-Up>Customer Marketing” and will provide customer related merge data fields |
Realtor Marketing |
The completed marketing campaign will be targeted for Realtor and executed in the “Follow-Up>Realtor Marketing” and will provide realtor related merge data fields |
3. Type a new Master Report Name
4. Type a new Master Report Description (optional)
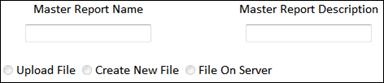
5. Click the appropriate selection
![]()
Upload |
Select this option, IF the marketing campaign has already been created and the file is accessible from a known location: · HTML · Microsoft Word (click Upload and browse to find the file) |
Create New File |
Select this option, IF the graphic file(s) are pre-prepared and those graphic image files already reside in your web server or Select this option, IF designing and/or composing a marketing campaign from within the ECU (graphic image files must already reside in your web server) |
File on Server |
Select this option, if the marketing campaign is coming from an existing pre-generated file that’s been previously upload to the FTP site, but yet to be displayed in the ECU list (click from the list to SELECT the file) |
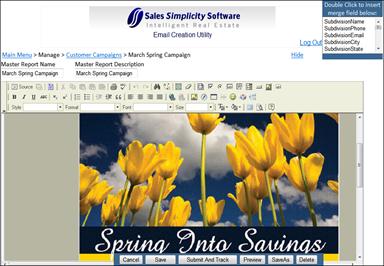
Step 3 – Finish Editing the New Marketing Campaign or Template
1. Start typing, inserting graphic(s), and create hyperlink(s) information
(see “ECU Web Editing Tool” below)
2. For continuous sentence, the text will automatically wrap, based on pre-determined area of the HTML page
3. However, to manually shift to the next line, use “SHIFT-ENTER”, as oppose to simply pressing the “Enter” key
4. To insert a merge data field (data coming from Sales Simplicity), from the top right corner drop down list, select and click to insert a Merge Field below
5. When editing is complete, click the appropriate button
Selection Types:
![]()
Types |
Description |
Cancel |
Cancel - remove or revoke any changes made since the last save. |
Save |
Save - any changes made to an existing marketing campaign (by clicking the “Save” button, this action will modify and overwrite the original document, however the statistical report tracking will continue to be maintained, based on status of the original report (file) |
Submit and Track |
Submit and Track - enables statistical report tracking of ‘links’ and ‘email’ open rates (by clicking the “Submit and Track” button, this action will automatically enable statistical report tracking of checked links and email open rates, when the marketing campaign is sent from Sales Simplicity) |
Preview |
Preview - allows for previewing and sending a ‘Test’ email of the completed marketing campaign |
Save As |
SaveAs – this feature allows for saving the existing file name to another file name, along with any changes that’s been made. (by clicking the “Save As” button, this action will NOT automatically enable statistical report tracking – “Submit and Track” must be initiated in order to manually enable statistical report tracking of checked links and email open rates, when the marketing campaign is sent from Sales Simplicity) |
![]()
* To return, click either Main Menu or Customer Marketing links
![]()
6. At this point, log-In to “Sales Simplicity”, go to Follow-Up > Customer Marketing or Realtor Marketing in order to email blast the completed marketing campaign to either all customers, targeted customers, or realtors.
ECU Web Editing Tool
The Web Editor is an easy to use editing tool used to create an HTML web page(s). It provides most of the commonly used functions (like Microsoft Word) to write text, formatting, create tables, etc.
The following provides a quick overview of all basic functions available in the Web Editor Toolbar.
Toolbar |
Function |
|
View or edit the HTML source code (for advanced users only) |
|
Removes all contents to create a new blank page |
|
Saves the page you were editing |
|
Preview what the HTML page will look like for users |
|
Select a layout template |
|
Cut the highlighted text to the clipboard |
|
Copy the highlighted text to the clipboard |
|
Paste the data copied to the clipboard (with or without formatting) |
|
Paste content copied from Microsoft Word or similar applications |
|
Print the current document |
|
Spell checks the text in the document |
|
Undo or redo the most recent action taken |
|
Find a word or phrase within the document |
|
Find and replace a word or phrase within the document |
|
Select the entire text in the document |
|
Remove the formatting of the highlighted text |
|
Applies
bold, italic, underscore or |
|
Superscript or subscript the highlighted text |
|
Creates numbered or bulleted lists |
|
Increase or decrease the text indentation |
|
Format a block of text to identify quotations (text provenient from other sources) |
|
Sets the text alignment to left, centered, right, or justified |
|
Converts or removes the text in hyperlinks and can also be used to manage file uploads and links to files on the web server |
|
Inserts or modifies a link anchor |
|
Inserts images into the document |
|
Inserts an Adobe Flash element into the page |
|
Creates a table with the defined number of columns and rows |
|
Inserts a divider line (horizontal rule) |
|
Inserts an emoticons image (smiley faces, email icon, lightbulb, etc.) |
|
Inserts symbols & special characters |
|
Inserts a printing page break (only impacts printed version) |
|
Styles
& formatting determine the appearance and semantic value of
your document. You may use the drop down boxes to apply styles,
set the font, its size, etc. |
|
Changes the color of the text |
|
Changes the background color of the text |
|
Toggles between maximize or minimize the editor size inside the browser |
|
Shows where the block elements boundaries in the text |
![]()
* IF statistical tracking is required, then the marketing campaign must be initially setup with “Submit and Track” enabled in the ECU.
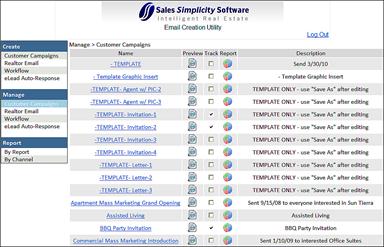
1. In the Manage (Edit) category tab, select Customer Marketing or Realtor Marketing
2. Select from the list of “Template” or “Existing” marketing campaign.
(the Name of the report is based on how YOU named the marketing campaign template and description)
3. Click a selected Template/Existing Report by the following icon:
Action Type |
Description |
|
Click this icon to preview / test the selected marketing campaign |
4. Review and verify any changes that’s been made
Step 5 – Enable “Submit and Track”
1. In the Manage (Edit) category tab, select Customer Marketing or Realtor Marketing
2. Select from the list of “Template” or “Existing” marketing campaign.
(the Name of the report is based on how YOU named the marketing campaign template and description)
3. Click a selected Template/Existing Report by the following icon:
Action Type |
Description |
|
|
How to Edit an Existing Marketing Campaign or Template
![]()
* To return, click either Main Menu or Customer Marketing links
* The Name of the report is based on how YOU named the marketing campaign template and description
|
- To Manage (edit) an Existing Marketing Campaign or Template in: ¡ Customer
Marketing ¡ Realtor
Marketing ¡ Workflow (internal workflow notification) ¡ eLead Response (eLead Auto Response) |
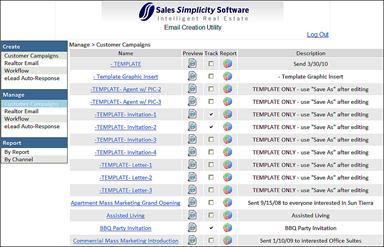
Step 1 – Decide which Existing Template or Campaign to Edit
1. In the Manage (Edit) category tab, select Customer Marketing or Realtor Marketing name
2. Select from the list of “Template” or “Existing” marketing campaign.
(the Name of the report is based on how YOU named the marketing campaign template and description)
3. Click a selected Template or Existing Report by:
Action Type |
Description |
Name (of Marketing campaign) |
click the Name link to start Editing the selected marketing campaign |
4. Edit the selected Template or Existing Report
Step 2 – Saving from Old to a New Report Name by using “Save As”
1. SaveAs – this feature allows for saving the existing file name to another file name, along with any changes that’s been made
Step 3 – Preview and Test the Marketing Campaign
1. In the Manage (Edit) category tab, select Customer Marketing or Realtor Marketing
2. Select
from the list of “Template” or “Existing” marketing campaign.
(the Name
of the report is based on how YOU named
the marketing campaign template and description)
3. Click a selected Template/Existing Report by the following icon:
Action Type |
Description |
|
Click this icon to preview / test the selected marketing campaign |
4. Review and verify any changes that’s been made
Step 4 – Enable “Submit and Track”
1. In the Manage (Edit) category tab, select Customer Marketing or Realtor Marketing
2. Select from the list of “Template” or “Existing” marketing campaign.
(the Name of the report is based on how YOU named the marketing campaign template and description)
3. Click a selected Template/Existing Report by the following icon:
Action Type |
Description |
|
|
How to Perform an eMail Blast Marketing to Customer or Realtor
Step 1 – Perform the Mass eBlast Marketing
1. Log-in to Sales Simplicity
2. Click the Follow-Up section, then click the Customer Marketing or Realtor Marketing tab
Type of Marketing |
Description |
Customer Marketing |
The completed marketing campaign will be targeted for Customer and executed in the “Follow-Up>Customer Marketing” and will provide customer related merge data fields |
Realtor Marketing |
The completed marketing campaign will be targeted for Realtor and executed in the “Follow-Up>Realtor Marketing” and will provide realtor related merge data fields |
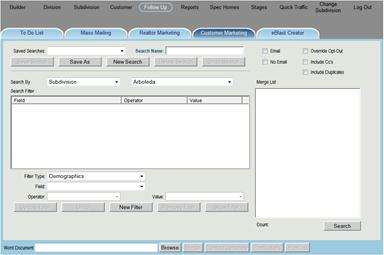
For Customer Marketing:
3. Decide whether to Search By:
¡ Builder level – ability to search for all customers across all divisions and subdivisions from within all divisions
¡ Division level – ability to search for all customers on a specific division and all subdivisions from within that specific division
¡ Subdivision level – ability to search for all customers from the logged-in subdivision
4. To search for customers using specific criteria, multiple criteria, or no criteria, based on Demographics, Date Fields, and/or Other Fields
5. Click the New Filter button (optional)
6. When the search criteria has been defined, click the Search button
7. Customer data that meets the criteria will be displayed in the right column (Merge List)
8. To add additional criteria, click the New Filter button (again)
9. Click the þ Email check box, then click the Search button
(HTML mass marketing campaigns can only be sent to customers with email addresses, so…)
For Realtor Marketing:
3. Select View All, then Check All or by specific Realtor Name or Select Company
4. Click the þ Email check box, then click the Search button
(HTML mass marketing campaigns can only be sent to realtors with email addresses, so…)
Continuation… for both Realtor and Customer Marketing:
1. Click the Merge button
2. Select a marketing campaign from the Email Document drop down list
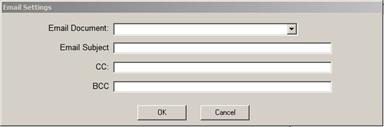
3. Type a subject title in the Email Subject field
4. Click the OK button
5. Click the Contact Complete button, to mark the task is complete
6. After a few hours / days, initiate the Statistical Tracking Report
![]()
* ALL emails sent via “Follow-Up>Customer Marketing” utilizes Sales Simplicity’s email server for mass marketing distribution
How to View the eMail Blast Statistical Tracking Report
Step 1 – Review / Generate Statistical Report
1. In the Manage area, select Customer Marketing or Realtor Marketing
2. Select from the list of “Existing” marketing campaign.
(the Name of the report is based on how YOU named the marketing campaign template and description)
3. Click a selected existing Report by the following icon:
Action Type |
Description |
|
Click this icon to preview / generate the statistical tracking report of the selected marketing campaign |
-or-
|
- To view statistical tracking Reports for an Existing Marketing Campaign for: ¡ Customer Marketing (marketing related toward Customer) ¡ Realtor Marketing (marketing related toward Realtor)
|
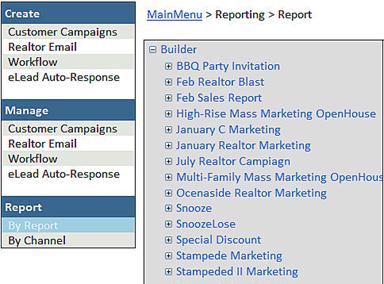
1. In the Reports category
2. Select style of reports to view

Report By |
Description |
By Report Name |
View statistical report by Report Name |
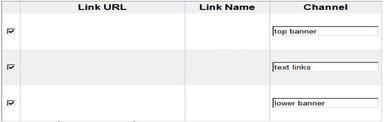
By Channel Label |
View statistical report by Channel Label (Channel are hyperlinks on marketing campaigns that can be tracked, based on Channel label name – see sample “Step-3b” below) |
Step 3a – Select View By - Report Name
1. Select from the list of existing reports (files)
2. Click the [+] to expand the selected report

Step 3b – Select View By - Channel
1. Click the [+] to expand the selected report
|
|
|
Step 4 – View the Statistical Tracking Report
1. Review the report “Statistics”
2. Click the blue numerical value to view detail information