
The following section provides instructions for creating a “User Profile” and assigning a “User Type with Permission” in Sales Simplicity. There are three (3) basic steps to creating a User Login ID:
· Information
· Access
· Permissions
* Bolded BLUE fields are required in order to save the record
How to Create User Profile Information
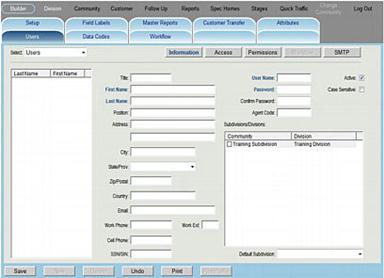
Step 1 – Create a User Profile
1. Click the Builder section > User tab > Information sub tab
2. Click the New button
3. Type the User’s First and Last Name (required)
4. Type the Login name and Password (minimum of four (4) characters with a combination of alpha and numeric characters is required)
5. Fill in all appropriate detail information associated with the user
6. In the Subdivisions list view; click þon Subdivision to permit access to (required)
7. Select a Default Subdivision from the drop down list
8. When complete, click the Save button
How to Set Up User Access

Step 2 – Set Up the User Access
1. Click the Builder section > User tab > Access sub tab
2. Select a User from the list view
3. Click the User Type drop-down list and select the appropriate user type
4. Optional -to change Access to a Section, select the appropriate Section from the drop-down list and þ or ¨ the Accessible box
5. Optional -to change Access to a Tab, select the appropriate Section Tab in the list view, then click the Tab Access Level drop-down list and select “Full”, “View Only”, or “None”
6. Optional -select a Startup Screen, if necessary
7. Optional -select Option Role, if necessary
- Both
- Sales Agent
- Design Center
8. Optional -to select a Department, if necessary
9. Optional -a Users’ Access and Permissions can also be copied from an existing User by using the Copy from Another User button
10. When complete, click the Save button
Static User Type - Default Access and Permission Settings Overview
The following table represents four static Sales Simplicity User Types - Administrator, Sales Agent, Design Consultant and Lender, which cannot be modified.
The Static User Types, by default, are grey in color. The color can be changed for Static User types under the Builder > Field Labels > Common > Colors screen.
Section and Tabs |
User Type - Access Level |
|||
Administrator |
Sales Agent |
Design Consultant |
Lender |
|
Builder |
Access |
No Access |
No Access |
No Access |
Setup |
Full |
None |
None |
None |
Users |
Full |
None |
None |
None |
Field Labels |
Full |
None |
None |
None |
Data Codes |
Full |
None |
None |
None |
Master Reports |
Full |
None |
None |
None |
Workflow |
Full |
None |
None |
None |
Customer Transfer |
Full |
None |
None |
None |
VAT |
Full |
None |
None |
None |
Attributes |
Full |
None |
None |
None |
Division |
Access |
Limited |
No Access |
Limited |
Setup |
Full |
None |
None |
None |
Data Codes |
Full |
None |
None |
None |
Follow-Up |
Full |
None |
None |
None |
Contracts |
Full |
None |
None |
None |
Lenders |
Full |
None |
None |
Full |
Mortgages |
Full |
None |
None |
Full |
Realty Company |
Full |
Full |
None |
None |
Realtor/Broker |
Full |
Full |
None |
None |
Master Plans |
Full |
None |
None |
None |
Master Options |
Full |
None |
None |
None |
Option Rules |
Full |
None |
None |
None |
Workflow |
Full |
None |
None |
None |
Subdivision |
Access |
No Access |
No Access |
No Access |
Setup |
Full |
None |
None |
None |
Data Codes |
Full |
None |
None |
None |
Follow-Up |
Full |
None |
None |
None |
Contracts/Reports |
Full |
None |
None |
None |
Phases |
Full |
None |
None |
None |
Lots |
Full |
None |
None |
None |
Floor Plans |
Full |
None |
None |
None |
Plan Options |
Full |
None |
None |
None |
Lot/Plan Matrix |
Full |
None |
None |
None |
Workflow |
Full |
None |
None |
None |
Customer |
Access |
Access |
Limited |
No Access |
Buyer |
Full |
Full |
View Only |
None |
Co-Buyer |
Full |
Full |
View Only |
None |
Demographics |
Full |
Full |
View Only |
None |
Notes |
Full |
Full |
View Only |
None |
Lots and Plans |
Full |
Full |
View Only |
None |
Options |
Full |
Full |
Full |
None |
Mortgage |
Full |
Full |
View Only |
None |
Deposits |
Full |
Full |
View Only |
None |
Stipulations |
Full |
Full |
View Only |
None |
Contract |
Full |
Full |
View Only |
None |
Rent vs. Buy |
Full |
Full |
None |
None |
Reports/Depts |
Full |
Full |
View Only |
None |
Follow-Up |
Access |
Access |
No Access |
No Access |
To Do List |
Full |
Full |
None |
None |
Mass Mailing |
Full |
Full |
None |
None |
Realtor Marketing |
Full |
Full |
None |
None |
Customer Marketing |
Full |
Full |
None |
None |
Reports |
Access |
Limited |
Limited |
No Access |
Builder |
Full |
None |
None |
None |
Division |
Full |
None |
None |
None |
Subdivision |
Full |
None |
None |
None |
Agent |
Full |
Full |
Full |
None |
Spec Homes |
Access |
Access |
No Access |
No Access |
Lot and Plan |
Full |
View Only |
None |
None |
Options |
Full |
View Only |
None |
None |
Stages |
Access |
Access |
Limited |
No Access |
Construction |
Full |
View Only |
View Only |
None |
Escrow |
Full |
View Only |
View Only |
None |
Quick Traffic |
Access |
Access |
Limited |
No Access |
|
Full |
Full |
View Only |
None |
* Lender-User
–
is a user that is associated with a specific Lender and will only have
access to Division > Lender and Division > Mortgage tabs. When
configured in conjunction with a ‘Lender’ from the drop-down selection
list, the Lender-User will then be limited to working with data associated
with their own Lender and Mortgage Plans, only. If associated
with Lender in more than one Division, then the Lender-User must have
a separate User Profile Login for each Division.
How to Set Up User Permission

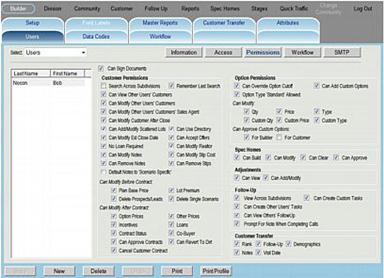
Step 3 – Set Up the User Permissions
1. Click the Builder section > User tab > Permission sub tab
2. Select a name from the Select User list view
3. Set up user permission levels and modify accordingly by þ or o
4. When complete, click the Save button
* Step 3 is OPTIONAL and can be skipped when utilizing pre-defined or Custom User Types.
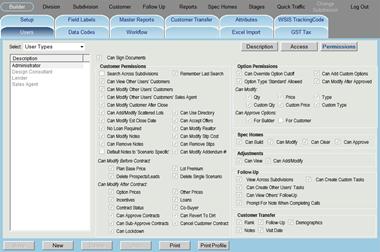
User Permission - Description Overview
Permission |
Description |
o Can Sign Documents |
For any user that’s authorize officer to sign a contract document for the builder (for use with Electronic Signature Pad only) |
Customer Permission |
|
o Search Across Subdivisions |
Ability to search for a customer record across multiple subdivisions |
o Remember Last Search |
Ability to remember any information entered at the Customer Search screen, next time Customer Search is accessed again |
o Can View Other Users’ Customers |
Ability to view (but NOT modify) another Sales Agents’ customer record |
o Can Modify Other Users’ Customers |
Ability to view and modify another Sales Agents’ customer record |
o Can Modify Other Users’ Customers’ Sales Agent |
Ability to modify the Sales Agent(s) field in another Sales Agents’ customer record |
o Can Modify Customer After Close |
Ability to modify a customer record (except for option selections) AFTER the buyer has closed on the property (ie: Customer Status = Homeowner) |
o Can Add/Modify Scattered Lots |
Ability to add/modify a scattered lot to a customer record in Customer > Lots and Plans (ie: Scattered Lot is a lot originally owned by the customer) |
o Can Modify Estimated Close Date |
Ability to enter or modify Estimated Close Date |
o No Loan Required |
Ability to take a customer to contract without selecting a mortgage plan |
o Can Modify Notes |
Ability to modify existing customer note |
o Can Remove Notes |
Ability to remove or delete a customer note |
o Default
Notes set to |
Ability to make all new notes scenario specific |
o Can Use Directory |
Allow users to create new Customers or Realtors based on existing individual information in the database |
o Can Accept Offers |
Allow a specific user to accept a customer offer |
o Can Modify Realtor |
When þ, once a Realtor/Broker is selected for a customer, the information will be displayed, but cannot be modified by the user |
o Can Modify Stipulation Cost |
Ability to enter or modify a customer stipulation with a stated cost |
o Can Remove Stipulation |
Ability to remove or delete a customer stipulation |
o Can Modify Addendum # |
When þ, the Addendum# field on the Customer>Contract tab will be enabled. When ¨, the Addendum# field on the Customer>Contract tab will be disabled. |
Can Modify BEFORE Contract: |
|
o Plan Base Price (Floor Plan) |
Ability to modify the plan base price for a customer – before taking the customer to contract |
o Lot Premium |
Ability to modify the lot premium for a customer – before taking the customer to contract |
o Delete Prospects/Leads |
Ability to delete a customer with a status = Prospect or Lead (limited to customer with NO paid deposits) |
o Delete Single Scenarios |
Ability to delete a customer scenario with a status of prospect or lead (will NOT allow user to delete the last scenario) |
Can Modify AFTER Contract: |
|
o Option Prices |
Ability to enter / modify a selected option price – after taking the customer to contract |
o Other Prices |
Ability to enter / modify base price and/or lot premium for a customer – after taking the customer to contract |
o Incentives |
Ability to modify any incentive(s) fields for the buyer – after taking the customer to contract (ie: Price Incentive, Lot Premium Incentive, Option Incentive, Upfront Costs Incentive) |
o Loans |
Ability to select or modify a mortgage plan – after taking the customer to contract |
o Contract Status |
Ability to access and modify field(s) in Customer > Contract – Contract Status area – after taking the customer to contract (ie: Contract Date, Actual Close Date) |
o Co-Buyer |
Ability to add or remove a co-buyer – after taking the customer to contract |
o Can Approve Contract |
Ability to approve contracts and utilize the ‘Static Cost” pop-up window that displays prices/costs associated with the sale, margins, and markups |
o Can Revert To Dirt |
Ability to revert a lot back to dirt, during the cancellation process a buyer contract (when utilized - the selected lot, floor plan, and all options will still be attached to the customer record) |
o Cancel Customer Contract |
Ability to cancel a buyer’s contract – after taking the customer to contract |
o Can Lock Down |
This permission allows a user the ability to lock down customer contracts.
A job “lockdown” means sales agents are no longer allowed to make certain financial and other specific changes to a customer’s contract that has been locked.
When þ, a User will see a new button called “Lockdown” in the customer’s Total Price Breakdown (TPB) area displayed to the right of each of the customer tabs. Only customers that are currently under contract will be able to be locked down, therefore the Lockdown button will only appear when a customer is in Buyer status. |
Option Permission |
|
o Can Override Option Cutoff |
Ability to select / remove an option from a customer or spec lot, after the “Actual Start Date” in the option’s cutoff Stage of Construction has occurred (assumption – Stages of Construction are actively updated) |
o Can Add Custom Options |
Ability to add Custom Options to a Customer and/or a Spec Home. |
o Option Type ‘Standard’ Allowed |
When þ, this feature allows a user from changing any option’s payment type from ‘Finance’ or ‘Cash’ to 'Standard' |
o Can Modify After Approved |
IF þ, this feature allows a user to Change an option AFTER it has been Approved or Rejected IF ¨, this feature restricts a user when attempting to modify an existing option: o If an option has been APPROVED by both the Builder and the Customer, it cannot be REJECTED. o If an option has been REJECTED by either the Builder or the Customer, it cannot be APPROVED. o If an option has been APPROVED by either the Builder or the Customer, it cannot be modified (except to change the approval status). This includes attributes and attachments for that option. |
Can Modify: |
|
o Quantity |
Ability to modify the quantity of a selected option |
o Price |
Ability to modify the price of a selected option |
o Type (Option Payment Type) |
Ability to modify the payment type of a selected option (ie: available payment types – Cash, Finance, Standard) |
o Custom Quantity |
Ability to modify the quantity of a requested custom option |
o Custom Price |
Ability to modify the price of a requested custom option |
o Custom Type |
Ability to modify the payment type of a requested custom option (ie: available payment types – Cash, Finance, Standard) |
Can Approve Custom Options: |
|
o For Builder |
Ability to approve a customer requested custom option on behalf of the builder |
o For Customer |
Ability to approve a customer requested custom option item on behalf of the customer |
Spec Homes |
|
o Can Build |
Ability to create a Spec home |
o Can Modify |
Ability to modify a Spec home |
o Can Clear |
Ability to remove the plan and options from an existing Spec home |
o Can Approve |
Ability to ‘Approve’ a spec home which will display the profit margin analysis of the Spec Home. |
Adjustments |
|
o Can View |
Ability
to view adjustments forms for various price and incentive fields
|
o Can Add/Modify |
Ability
to add/modify adjustments forms for various price and incentive
fields |
Follow-Up |
|
o View Across Subdivisions |
Ability to view assigned customer follow-up tasks across multiple subdivisions, within the same (logged-in) Division (limited only to þ subdivisions in Builder > Users > Information) |
o Can Create Custom Tasks |
Ability to create and schedule a new task; if permission is not checked o, then the “Schedule New Task For” and “Write New Letter” sections of the Follow-Up > To Do List tab will be completely hidden |
o Can Create Other Users’ Tasks |
When þ, the “Assign To” drop-down list will be displayed and will have the ability to create and schedule a new task to any other active user that has permission to access the Subdivision of the Selected Customer. |
o Can View Others’ Follow-Up |
When þ, the “My Task List” drop-down list in the “Search” area of the Follow-Up > To Do List tab will be displayed |
o Prompt For Note When Completing Phone Call Tasks |
Have Sales Simplicity prompt the user for customer note entry when follow-up call task are marked as complete |
Customer Transfer |
|
o Rank |
When transferring customer(s) to another subdivision, allow transfer of the customer’s current rank |
o Follow-Up |
When transferring customer(s) to another subdivision, allow transfer of the customer’s completed follow-up task(s) |
o Demographics |
When transferring customer(s) to another subdivision, allow transfer of the customer’s demographics (same demographic data code(s) must exist in target subdivision) |
o Notes |
When transferring customer(s) to another subdivision, allow transfer of the customer’s note(s) |
o Visit Date |
When transferring customer(s) to another subdivision, allow transfer of the original Visit Date to the new customer record |
How to Create a Custom User Type
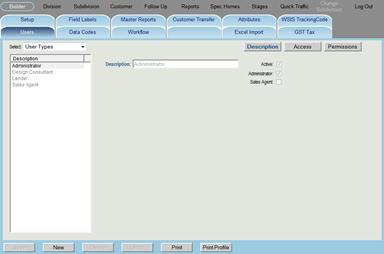
Step 1 – Create a Custom Description
1. Click the Builder section > Users tab
2. In the Select drop down list, select User Type
3. Click the New button
4. Type a Description label (required)
5. To provide access to all Subdivision, place þ for Administrator
6. To indicate user type as Sales Agent, place þ for Sales Agent
7. When complete, click the Save button
How to Create Custom User Type Access
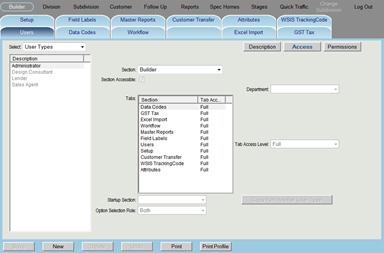
1. Click the Builder section > Users tab
2. Click the User Type drop-down list and select the custom user type to edit
3. Optional -to change Access to a Section, select the appropriate Section from the drop-down list and þ or ¨ the Accessible box
4. Optional -to change Access to a Tab, select the appropriate Section Tab in the list view, then click the Tab Access Level drop-down list and select “Full”, “View Only”, or “None”
5. Optional -select a Startup Screen, if necessary
6. Optional -select Option Role, if necessary
- Both
- Sales Agent
- Design Center
7. Optional -to select a Department, if necessary
8. Optional -a Users’ Access and Permissions can also be copied from an existing User by using the Copy from Another User button
9. When complete, click the Save button
How to Create Custom User Permission

Step 3 – Set Up the Custom Permissions
1. Click the Builder section > Users tab
2. Click the User Type drop-down list and select the custom user type to edit
3. Set up user permission levels and modify accordingly by þ or o
4. When complete, click the Save button
User Permission - Description Overview
Permission |
Description |
o Can Sign Documents |
For any user that’s authorize officer to sign a contract document for the builder (for use with Electronic Signature Pad only) |
Customer Permission |
|
o Search Across Subdivisions |
Ability to search for a customer record across multiple subdivisions |
o Remember Last Search |
Ability to remember any information entered at the Customer Search screen, next time Customer Search is accessed again |
o Can View Other Users’ Customers |
Ability to view (but NOT modify) another Sales Agents’ customer record |
o Can Modify Other Users’ Customers |
Ability to view and modify another Sales Agents’ customer record |
o Can Modify Other Users’ Customers’ Sales Agent |
Ability to modify the Sales Agent(s) field in another Sales Agents’ customer record |
o Can Modify Customer After Close |
Ability to modify a customer record (except for option selections) AFTER the buyer has closed on the property (ie: Customer Status = Homeowner) |
o Can Add/Modify Scattered Lots |
Ability to add/modify a scattered lot to a customer record in Customer > Lots and Plans (ie: Scattered Lot is a lot originally owned by the customer) |
o Can Modify Estimated Close Date |
Ability to enter or modify Estimated Close Date |
o No Loan Required |
Ability to take a customer to contract without selecting a mortgage plan |
o Can Modify Notes |
Ability to modify existing customer note |
o Can Remove Notes |
Ability to remove or delete a customer note |
o Default
Notes set to |
Ability to make all new notes scenario specific |
o Can Use Directory |
Allow users to create new Customers or Realtors based on existing individual information in the database |
o Can Accept Offers |
Allow a specific user to accept a customer offer |
o Can Modify Realtor |
When þ, once a Realtor/Broker is selected for a customer, the information will be displayed, but cannot be modified by the user |
o Can Modify Stipulation Cost |
Ability to enter or modify a customer stipulation with a stated cost |
o Can Remove Stipulation |
Ability to remove or delete a customer stipulation |
o Can Modify Addendum # |
When þ, the Addendum# field on the Customer>Contract tab will be enabled. When ¨, the Addendum# field on the Customer>Contract tab will be disabled. |
Can Modify BEFORE Contract: |
|
o Plan Base Price (Floor Plan) |
Ability to modify the plan base price for a customer – before taking the customer to contract |
o Lot Premium |
Ability to modify the lot premium for a customer – before taking the customer to contract |
o Delete Prospects/Leads |
Ability to delete a customer with a status = Prospect or Lead (limited to customer with NO paid deposits) |
o Delete Single Scenarios |
Ability to delete a customer scenario with a status of prospect or lead (will NOT allow user to delete the last scenario) |
Can Modify AFTER Contract: |
|
o Option Prices |
Ability to enter / modify a selected option price – after taking the customer to contract |
o Other Prices |
Ability to enter / modify base price and/or lot premium for a customer – after taking the customer to contract |
o Incentives |
Ability to modify any incentive(s) fields for the buyer – after taking the customer to contract (ie: Price Incentive, Lot Premium Incentive, Option Incentive, Upfront Costs Incentive) |
o Loans |
Ability to select or modify a mortgage plan – after taking the customer to contract |
o Contract Status |
Ability to access and modify field(s) in Customer > Contract – Contract Status area – after taking the customer to contract (ie: Contract Date, Estimated Close Date, Approval Date, Approved By, Actual Close Date) |
o Co-Buyer |
Ability to add or remove a co-buyer – after taking the customer to contract |
o Can Approve Contract |
Ability to approve contracts and utilize the ‘Static Cost” pop-up window that displays prices/costs associated with the sale, margins, and markups |
o Can Revert To Dirt |
Ability to revert a lot back to dirt, during the cancellation process a buyer contract (when utilized - the selected lot, floor plan, and all options will still be attached to the customer record) |
o Cancel Customer Contract |
Ability to cancel a buyer’s contract – after taking the customer to contract |
o Can Lock Down |
This permission allows a user the ability to lock down customer contracts.
A job “lockdown” means sales agents are no longer allowed to make certain financial and other specific changes to a customer’s contract that has been locked.
When þ, a User will see a new button called “Lockdown” in the customer’s Total Price Breakdown (TPB) area displayed to the right of each of the customer tabs. Only customers that are currently under contract will be able to be locked down, therefore the Lockdown button will only appear when a customer is in Buyer status. |
Option Permission |
|
o Can Override Option Cutoff |
Ability to select / remove an option from a customer or spec lot, after the “Actual Start Date” in the option’s cutoff Stage of Construction has occurred (assumption – Stages of Construction are actively updated) |
o Can Add Custom Options |
Ability to add Custom Options to a Customer and/or a Spec Home. |
o Option Type ‘Standard’ Allowed |
When þ, this feature allows a user from changing any option’s payment type from ‘Finance’ or ‘Cash’ to 'Standard' |
o Can Modify After Approved |
IF þ, this feature allows a user to Change an option AFTER it has been Approved or Rejected IF ¨, this feature restricts a user when attempting to modify an existing option: o If an option has been APPROVED by both the Builder and the Customer, it cannot be REJECTED. o If an option has been REJECTED by either the Builder or the Customer, it cannot be APPROVED. o If an option has been APPROVED by either the Builder or the Customer, it cannot be modified (except to change the approval status). This includes attributes and attachments for that option. |
Can Modify: |
|
o Quantity |
Ability to modify the quantity of a selected option |
o Price |
Ability to modify the price of a selected option |
o Type (Option Payment Type) |
Ability to modify the payment type of a selected option (ie: available payment types – Cash, Finance, Standard) |
o Custom Quantity |
Ability to modify the quantity of a requested custom option |
o Custom Price |
Ability to modify the price of a requested custom option |
o Custom Type |
Ability to modify the payment type of a requested custom option (ie: available payment types – Cash, Finance, Standard) |
Can Approve Custom Options: |
|
o For Builder |
Ability to approve a customer requested custom option on behalf of the builder |
o For Customer |
Ability to approve a customer requested custom option item on behalf of the customer |
Spec Homes |
|
o Can Build |
Ability to create a Spec home |
o Can Modify |
Ability to modify a Spec home |
o Can Clear |
Ability to remove the plan and options from an existing Spec home |
o Can Approve |
Ability to ‘Approve’ a spec home which will display the profit margin analysis of the Spec Home. |
Adjustments |
|
o Can View |
Ability
to view adjustments forms for various price and incentive fields
|
o Can Add/Modify |
Ability
to add/modify adjustments forms for various price and incentive
fields |
Follow-Up |
|
o View Across Subdivisions |
Ability to view assigned customer follow-up tasks across multiple subdivisions, within the same (logged-in) Division (limited only to þ subdivisions in Builder > Users > Information) |
o Can Create Custom Tasks |
Ability to create and schedule a new task; if permission is not checked o, then the “Schedule New Task For” and “Write New Letter” sections of the Follow-Up > To Do List tab will be completely hidden |
o Can Create Other Users’ Tasks |
When þ, the “Assign To” drop-down list will be displayed and will have the ability to create and schedule a new task to any other active user that has permission to access the Subdivision of the Selected Customer. |
o Can View Others’ Follow-Up |
When þ, the “My Task List” drop-down list in the “Search” area of the Follow-Up > To Do List tab will be displayed |
o Prompt For Note When Completing Phone Call Tasks |
Have Sales Simplicity prompt the user for customer note entry when follow-up call task are marked as complete |
Customer Transfer |
|
o Rank |
When transferring customer(s) to another subdivision, allow transfer of the customer’s current rank |
o Follow-Up |
When transferring customer(s) to another subdivision, allow transfer of the customer’s completed follow-up task(s) |
o Demographics |
When transferring customer(s) to another subdivision, allow transfer of the customer’s demographics (same demographic data code(s) must exist in target subdivision) |
o Notes |
When transferring customer(s) to another subdivision, allow transfer of the customer’s note(s) |
o Visit Date |
When transferring customer(s) to another subdivision, allow transfer of the original Visit Date to the new customer record |
How to Set Up Workflow Email Notification
There are 53 workflows in the Builder section and Workflows tab and 52 workflows in the other levels. When triggered, an email notification will automatically be sent to the designated recipient(s).
Workflow Level to Enable Email Notification Overview
Workflow process assignment depends entirely on the builder’s internal business structure, relative to Sales Simplicity data structure levels - Builder, Division, Subdivision, and User.
· Builder Workflow Level
When a workflow task is assigned at the Builder level, this means that if any user that logs-in to any of the subdivisions and performs any of the assigned workflow tasks, an email will automatically be sent to the recipient(s) indicated in the “Address(es)” field.
· Division Workflow Level
When a workflow task is assigned at the Division level, this means that if any user logs-in to any of the subdivisions within a Division and performs any of the assigned workflow tasks, an email will automatically be sent to the recipient(s) indicated in the “Address(es)” field.
· Subdivision Workflow Level
When a workflow task is assigned at the Subdivision level, this means that if any user logs-in to a specific subdivision and performs any of the assigned workflow tasks, an email will automatically be sent to the recipient(s) indicated in the “Address(es)” field.
· User Workflow Level Tasks
When a workflow task is assigned at the User level, this means that if a specific user logs in and performs any of the assigned workflow tasks, an email will automatically be sent to the recipient(s) indicated in the “Address(es)” field.
Workflow Processes and Triggers Overview
Process |
Triggers |
Lot Reserved |
Customer > Lots and Plans – Click Reserve Lot button |
Lot Reservation Updated |
Customer > Lots and Plans – Click Update Reservation button |
Lot Reservation Removed |
Customer > Lots and Plans – Click Free Lot button |
Lot Reservation Expired |
Customer > Lots and Plans - Depending on this subdivision > permission ‘Automatically free expired primary reservations’ The workflow will generate when logging into the Subdivision that has reservations due to expire. If the above permission is enabled, the primary reservation will automatically expire. If the above permission is not enabled, then click Free Lot. Free Lot will also need to be used if any backup reservations expire. |
Prospect Custom Option Created |
Customer > Options – Click Save button, after creating a Custom Option for a customer whose status is Prospect |
Prospect Custom Option Updated |
Customer > Options – Click Save button, after modifying a Custom Option for a customer whose status is Prospect |
Prospect Custom Option Removed |
Customer > Options – Click Save button, after removing a Custom Option for a customer whose status is Prospect |
New Contract |
Customer > Contract – Click Print button, or Preview a Contract Document |
Contract Cancellation |
Customer > Contract – Click Cancel Contract button |
Contract Approved |
Customer > Contract – Click Save button, after entering an Approval Date |
Approval Updated |
Customer > Contract – Click Save button, after modifying an Approval Date |
Approval Removed |
Customer > Contract – Click Save button, after removing an Approval Date |
Change Order |
Customer > Options – Click Save after making modifications to selected options |
Buyer Custom Option Created |
Customer > Options – Click Save button, after creating a Custom Option for a customer whose status is Buyer |
Buyer Custom Option Updated |
Customer > Options – Click Save button, after modifying a Custom Option for a customer whose status is Buyer |
Buyer Custom Option Removed |
Customer > Options – Click Save button, after removing a Custom Option for a customer whose status is Buyer |
Estimated Close Date Entered |
Customer > Contract – Click Save after entering an Estimated Close Date |
Estimated Close Date Updated |
Customer > Contract – Click Save button, after modifying an Estimated Close Date |
Estimated Close Date Removed |
Customer > Contract – Click Save button, after removing an Estimated Close Date |
Customer Note Added |
Customer > Notes & Follow Up > To Do List > Customer Notes – Click Save button, after creating a new Customer Note |
Customer Note Updated |
Customer > Notes & Follow Up > To Do List > Customer Notes – Click Save button, after changing an existing Customer Note |
Stipulation Added |
Customer > Stipulations – Click Save button, after creating a new Customer Stipulation |
Stipulation Updated |
Customer > Stipulations – Click Save button, after changing an existing Customer Stipulation |
Deposit Scheduled |
Customer > Deposits – Click Save button, after entering a new Deposit |
Deposit Updated |
Customer > Deposits – Click Save button, after modifying an existing Deposit. (This does Not include entering or removing a Date Paid.) |
Deposit Paid |
Customer > Deposits – Click Save button, after entering the Date Paid. |
Deposit Paid Date Removed |
Customer > Deposits – Click Save button, after removing the Date Paid. |
Deposit Removed |
Customer > Deposits – Click Remove Deposit button, and then Click OK on the confirmation prompt. (Cannot remove any deposit that has a Date Paid.) |
Close Date Entered |
Customer > Contract – Click Save button, after entering an Actual Close Date |
Close Date Updated |
Customer > Contract – Click Save button, after modifying an Actual Close Date |
Close Date Removed |
Customer > Contract – Click Save button, after removing an Actual Close Date |
Spec Lot Created |
Spec Homes > Lots and Plans – Click Save button, after adding a Plan and a Garage Orientation to an Available Lot. |
Spec Lot Updated |
Spec Homes > Lots and Plans – Click Save button, after modifying any of six different fields on the Lots and Plans tab, or adding, modifying or removing any selected options for an existing Spec Lot. |
Spec Lot Cleared |
Spec Homes > Lots and Plans – Click Clear Lot button, and then Click OK on the confirmation prompt. |
Spec Custom Option Created |
Spec Homes > Options – Click Save button, after creating a Custom Option on a Spec Lot |
Spec Custom Option Updated |
Spec Homes > Options – Click Save button, after modifying a Custom Option for a Spec Lot |
Spec Custom Option Removed |
Spec Homes > Options – Click Save button, after removing a Custom Option from a Spec Lot |
Stage of Construction Updated |
Stages > Construction – Click Save button, after entering, updating or removing data from any field associated with a lot’s Stages of Construction. |
Stage of Escrow Updated |
Stages > Escrow – Click Save button, after entering, updating or removing data from any field associated with a Buyer or Homeowner’s Stages of Escrow. |
Custom Option Builder Approved |
Customer > Options – Click Save button, after marking the Builder “Approved” radio button |
Custom Option Builder Rejected |
Customer > Options – Click Save button, after marking the Builder |
Custom Option Customer Approved |
Customer > Options – Click Save button, after marking the Customer “Approved” radio button |
Custom Option Customer Rejected |
Customer > Options – Click Save button, after marking the Customer “Rejected” radio button |
Be-Back Created |
Customer > TPB (Total Price Breakdown) - When a be-back is added for a customer through either the ‘+’ or the ‘…’ eclipse. |
Be-Back Updated |
Customer > TPB (Total Price Breakdown) - When a be-back is modified |
Be-Back Removed |
Customer > TPB (Total Price Breakdown) - When a be-back is removed |
Counter Offer Buyer Added/Updated |
Customer > Contract - Click Save button, after entering counter offer data |
Counter Offer Seller Added/Updated |
Customer > Contract - Click Save button, after entering counter offer data |
Counter Offer Accepted |
Customer > Contract - Click Save button, after placing a þ on ‘Accepted’ |
Creation of a New Prospect |
Customer > New -event will generate an email when a customer is created and saved with the status of Prospect |
Creation of a New Lead |
Customer > New -event will generate an email when a customer is created and saved with the status of Lead |
Change of Customer Status |
Customer > Update This workflow event will generate an email only when the customer was originally a Lead or Prospect, and then changed to either a Lead or Prospect.
|
Bounce Limit Reached |
Event to alert a person or persons when either the soft or hard bounce limit is reached. This limit is set by the administrator on the Builder Setup tab.
|

Step 1 – Set Up the Workflow Task Assignments
1. Identify which LEVEL to assign the workflow tasks – Builder, Division, Subdivision, Users (can be a combination of multiple levels)
2. Identify which WORKFLOW processes to enable
3. In the Workflow Processes list view screen, click to highlight one of the workflow task
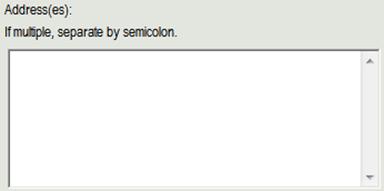
4. In the Address(es) view, type the recipient(s) email address
(if multiple recipients – use semicolon and a space (; ) to separate multiple email addresses)
5. Optional (select as applicable) - in the Also Send To… click þ to send to the appropriate recipient(s)
6. In the Email Documents drop-down list, select the appropriate workflow document
(as it relates to the selected Workflow Task assignment)
7. In the Subject field, type the appropriate email subject title
(as it relates to the selected Workflow Task assignment)
8. In the Email From field, type the appropriate email address
(suggestion – DoNotReply@builderwebsite.com)
9. When complete, click the Save button
10. Repeat the process (step-1 to step-9) for each workflow task assignment, until all identified task assignments are complete
How to Set Up a User SMTP Email Settings
Simple Mail Transfer Protocol (SMTP) settings are instructions for sending email messages between servers. Most email systems that send mail over the Internet use SMTP to send messages from one server to another. The default settings, which send all emails through Sales Simplicity’s mail server (though they still come from your email address), should work for everyone and does not require to be changed, unless there is a problem (or your IT Staff wants to use more spam-friendly settings that are unique for your business). Check with the individual who sets up the typical Outlook or other mail hosting accounts to see if they want these settings changed. If Sales Simplicity is self-hosted on your own server, the default settings may not work due to firewall constraints. Check with your email administrator to ensure emails will be sent.
SMTP settings allows for sending email using local computer from Follow Up > To Do List and Follow Up > Mail Merge
Label |
Description |
SMTP Server |
The mail server address from which mail will be sent. |
SMTP Port |
This controls the port for which incoming mail connections will be accepted. The standard SMTP port setting is 25. |
SMTP Timeout |
The maximum number of seconds that may elapse while waiting for a response from the recipient’s server. |
Use SMTP SSL |
Secure Sockets Layer (SSL) is a method for transmitting private messages via the Internet. Check this if your server uses this extra layer of security when sending messages. |
Authentication information is used to identify you as a valid user to the server from which mail messages are being sent.
Label |
Description |
SMTP Authenticate |
Checking this enables authentication. This will ensure only connections which give the correct user name and password are allowed to send outgoing emails. |
SMTP User Name |
The email address to use for authentication. |
SMTP Password |
The password to use for authentication. |
There is also a new box labeled “SMTP Settings” on the Builder Setup screen. These settings are similar to the email settings in Outlook or any other mail program.
SMTP settings are defined at three locations:
· Builder > Setup (configuration settings saved in Sales Simplicity)
· Builder > Users (configuration settings saved in Sales Simplicity)
· Local Computer SMTP Settings
Builder > Setup is the default settings, which send all emails through Sales Simplicity’s mail server (though they still come from your email address), should work for everyone and does not need to be changed unless there is a problem.
Builder > User > SMTP settings are for rare occasions where users may have a unique SMTP settings which are different from the Builder > Setup settings. Check with the person who set up your email accounts to see if this is necessary.
When the SMTP settings are defined at the user level, those are the settings that will be used when sending emails from Sales Simplicity. If the user SMTP settings are BLANK, the Builder > Setup SMTP settings will be used.
Local Computer SMTP Settings is managed by Windows OS at the local computer level. When using this setting, at first initiation or execution of sending out an email, a pop-up dialog will be displayed allowing the end-user to modify the SMTP outgoing email settings used by Sales Simplicity.
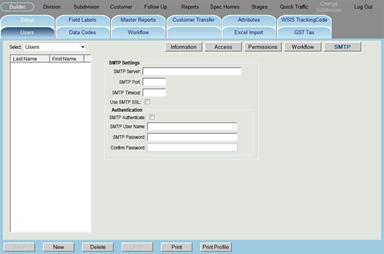
Step 1 – Set Up User SMTP Mail
1. Identify the parameters for each SMTP Settings:
- SMTP Server
- SMTP Port
- SMTP Timeout
- Use SMTP SSL
- SMTP Authenticate
- SMTP User Name
- SMTP Password
- Confirm Password
2. Type-in the parameter information
3. When complete, click the Save button